Aggregated resource
All-in-One
This page combines the lesson into one continuous view.
Lesson controls
Jump between episodes, filter the page, or reveal every hint and solution when you need the full teaching flow.
Episode
Getting Started: Rules, Targets, and the DAG
Questions
- How do I run my first Snakemake workflow?
- How does Snakemake connect rules together?
- How does Snakemake decide what needs to run again?
Objectives
- Create a minimal
Snakefilewithinput,output, andshell. - Run Snakemake by asking for an output file.
- Use
rule allto define the default workflow target. - Understand dry-runs and lazy re-execution.
Snakemake is a Python-based workflow management system for building reproducible and scalable data analysis pipelines Mölder et al., 2021.
In this episode, we build a small event-selection workflow and use it to introduce the main Snakemake idea: you ask for the output you want, and Snakemake works out the steps needed to create it.
A First Rule
Create a small input file:
cat <<'EOF' > events.txt
Background
Signal
Background
Signal
EOF
Now create a Snakefile with one rule:
rule select_events:
    input:
        "events.txt"
    output:
        "selected_events.txt"
    shell:
        "grep 'Signal' {input} > {output}"
This rule says:
- the input is
events.txt - the output is
selected_events.txt - the command that transforms one into the other is a shell command
Running by Target
Run Snakemake by asking for the output file you want:
pixi run snakemake --cores 1 selected_events.txtSnakemake looks at the requested target, finds a rule that can create it, and
then runs that rule because selected_events.txt does not exist yet.
select_events, but we do not run it by name. We ask for
the file we want, here selected_events.txt.Thinking Backwards
Now extend the workflow with a second rule:
rule select_events:
    input:
        "events.txt"
    output:
        "selected_events.txt"
    shell:
        "grep 'Signal' {input} > {output}"


rule count_events:
    input:
        "selected_events.txt"
    output:
        "event_counts.txt"
    shell:
        "wc -l {input} > {output}"
If you now run
pixi run snakemake --cores 1 event_counts.txtSnakemake reasons backwards:
- You want
event_counts.txt. count_eventscan create it, but it needsselected_events.txt.select_eventscan createselected_events.txtfromevents.txt.
This chain of dependencies is the Directed Acyclic Graph, or DAG. In a larger analysis, the same idea scales from two short rules to hundreds of jobs.
Defining a Default Target
If you do not specify a target on the command line, Snakemake uses the first
rule in the Snakefile. By convention, we make that first rule a rule called
all, which collects the final outputs we care about.
Update your Snakefile to:
rule all:
    input:
        "event_counts.txt"


rule select_events:
    input:
        "events.txt"
    output:
        "selected_events.txt"
    shell:
        "grep 'Signal' {input} > {output}"


rule count_events:
    input:
        "selected_events.txt"
    output:
        "event_counts.txt"
    shell:
        "wc -l {input} > {output}"
Now you can simply run:
pixi run snakemake --cores 1Dry-Runs and Lazy Re-Execution
Before running a workflow, it is often useful to ask Snakemake what it would do without actually executing anything:
pixi run snakemake -n -pThe -n flag performs a dry-run, and -p prints the shell commands.
If you run the workflow again immediately afterwards, Snakemake should report that nothing needs to be done, because all requested outputs are present and up to date.
This is one of the most useful features of Snakemake: it does not rerun everything blindly. It only reruns work when an output is missing or when one of its inputs has changed.
What Will Re-Run?
Update the timestamp of the original input:
touch events.txtRun a dry-run:
pixi run snakemake -n -p
Which rules does Snakemake want to rerun, and why?
Show solution
Snakemake should want to rerun both select_events and count_events.
Once events.txt becomes newer than selected_events.txt, the selected file is
considered stale. Since event_counts.txt depends on selected_events.txt, it
also becomes stale and must be recreated.
pixi run and
run snakemake directly. To keep the lesson readable, the main text uses the
Pixi-based commands only.Key Points
- A workflow is defined in a
Snakefile. - Snakemake works backwards from the output you request.
- Rules are connected by matching outputs to inputs.
rule alldefines the default target for the workflow.- Snakemake only reruns outputs that are missing or stale.
Episode
Scaling with Wildcards for Parallel Processing
Questions
- How can one rule process many event files?
- How can Snakemake run many file-based jobs in parallel and then combine their results?
- How do wildcards and
expand()help a workflow scale?
Objectives
- Use wildcards to run the same rule over many files.
- Use
expand()to define a whole collection of expected outputs. - Build a simple workflow that runs over many files in parallel and then gathers the results.
- Use
script:for a small gather step.
In particle physics, we rarely process just one file. A dataset is usually split across many files, we run the same selection on each file, and then we gather the results into a final summary or plot. Snakemake can run the file-by-file work in parallel and then combine the results. This pattern is often called scatter-gather.
In this episode, we use Snakemake wildcards to build that pattern in a simple form. We will assume that we already know which datasets and file chunks exist. In the next episode, we will look at what to do when that information is only discovered at run time.
Preparing the Input Files
Create a few toy inputs:
mkdir -p input/DYJets input/TTbar input/Data

for chunk in 0 1 2; do
    printf "Selected\nCutAway\nSelected\n" > "input/DYJets/DYJets.$chunk.txt"
    printf "Selected\nSelected\nCutAway\n" > "input/TTbar/TTbar.$chunk.txt"
    printf "CutAway\nSelected\nCutAway\n" > "input/Data/Data.$chunk.txt"
done
Each file stands in for one chunk of a larger dataset. Our workflow will:
- run an event selection on every file
- write one selected output per file
- gather all selected files into one final summary
In real analyses, a dataset is often split across many files so that the work
can be processed in parallel. Here we use three small chunks per dataset, with
the identifiers 0, 1, and 2. That is why the toy input files are named
like DYJets.0.txt and TTbar.2.txt.
The Parallel Step
We begin by defining the datasets and file chunks we expect:
DATASETS = ["DYJets", "TTbar", "Data"]
CHUNKS = ["0", "1", "2"]
We write the chunk identifiers as strings because Snakemake wildcards are
matched from file names. In a path such as input/DYJets/DYJets.0.txt, the
value of {chunk} is the text "0" taken from the file name.
Now we can write one generic rule for the selection step:
rule select_events:
    input:
        "input/{dataset}/{dataset}.{chunk}.txt"
    output:
        "selected/{dataset}/{dataset}.{chunk}.txt"
    shell:
        """
        mkdir -p "selected/{wildcards.dataset}"
        grep "Selected" "{input}" > "{output}" || test $? -eq 1
"""The grep command returns exit code 0 when it finds at least one match, and
exit code 1 when it finds no matches. In this workflow, a file with no
selected events is not an error: it should simply produce an empty output file.
The extra || test $? -eq 1 tells the shell to treat that specific case as
successful. If grep fails for a real reason, such as a missing input file, it
will return a different exit code and the rule will still fail as it should.
This rule does not mention DYJets, TTbar, or Data explicitly. Instead, it
uses the wildcards {dataset} and {chunk}. Snakemake fills those values in by
matching the file names you ask it to create.
If Snakemake needs selected/TTbar/TTbar.2.txt, it infers:
dataset = TTbarchunk = 2
and then runs the rule with the corresponding input file
input/TTbar/TTbar.2.txt.
The Gather Step
After the selection, we want one final summary across all selected files. We
can define that with rule all and expand():
DATASETS = ["DYJets", "TTbar", "Data"]
CHUNKS = ["0", "1", "2"]

rule all:
    input:
        "plots/event_counts.txt"


rule select_events:
    input:
        "input/{dataset}/{dataset}.{chunk}.txt"
    output:
        "selected/{dataset}/{dataset}.{chunk}.txt"
    shell:
        """
        mkdir -p "selected/{wildcards.dataset}"
        grep "Selected" "{input}" > "{output}" || test $? -eq 1
        """


rule make_plot:
    input:
        expand(
            "selected/{dataset}/{dataset}.{chunk}.txt",
            dataset=DATASETS,
            chunk=CHUNKS,
        )
    output:
        "plots/event_counts.txt"
    script:
        "plot.py"
The call to expand() generates the full list of selected files that we expect
to gather:
selected/DYJets/DYJets.0.txtselected/DYJets/DYJets.1.txtselected/DYJets/DYJets.2.txtselected/TTbar/TTbar.0.txt- and so on
This is the gather part of the workflow: one rule depends on many upstream files and combines them into one output.
Using script: for the Gather Logic
The final step is easier to read as a short Python script than as a long shell
command. Create a file called plot.py:
from collections import OrderedDict
from pathlib import Path


counts = OrderedDict()

for input_file in map(Path, snakemake.input):
    dataset = input_file.parent.name
    counts.setdefault(dataset, 0)

    with open(input_file, "r", encoding="utf-8") as handle:
        counts[dataset] += sum(
            1 for line in handle if line.strip() == "Selected"
        )

output_path = Path(snakemake.output[0])
output_path.parent.mkdir(parents=True, exist_ok=True)

with open(output_path, "w", encoding="utf-8") as handle:
    for dataset, count in counts.items():
        handle.write(f"{dataset}\t{count}\n")
This script reads every selected file, counts the remaining events for each dataset, and writes a small text summary.
shell: is often enough. For slightly richer logic,
script: keeps the workflow readable and lets you write ordinary Python.Running the Workflow
Start with a dry-run:
pixi run snakemake -n -pThen run the workflow with a few cores:
pixi run snakemake --cores 4Snakemake can run the independent select_events jobs in parallel and then run
make_plot once all selected files are ready.
This is the key scaling idea:
- run the same step across many independent files in parallel
- gather the results into a final output
Adding Another Dataset
Add WJets
Add a new dataset called WJets.
Add
"WJets"to theDATASETSlist.Create three input files:
mkdir -p input/WJets

for chunk in 0 1 2; do
    printf "Selected\nCutAway\nCutAway\n" > "input/WJets/WJets.$chunk.txt"
done
Run a dry-run and then the workflow again.
Which jobs should Snakemake add to the workflow?
Show solution
Snakemake should add three new select_events jobs for the WJets files and
then rerun make_plot, because the final summary now depends on additional
inputs.
The existing DYJets, TTbar, and Data selection outputs do not need to be
rerun.
Looking Ahead
This episode assumed that we knew the datasets and chunk identifiers in advance. That is often good enough, and it keeps the workflow simple.
Sometimes, however, the exact set of files is only known after an earlier step
has run. That is where Snakemake checkpoints become useful, and that is the
topic of the next episode.
Key Points
- Wildcards let one rule match many input and output files.
- Snakemake can run many independent jobs in parallel and then combine their outputs in a later step.
- expand() is a convenient way to define a collection of target files.
- script: is useful when a workflow step is more naturally written as a small Python script than as a shell one-liner.
Episode
Dynamic File Discovery with Checkpoints
Questions
- When are ordinary wildcards no longer enough?
- What does a
checkpointdo in Snakemake? - How does Snakemake expand the DAG after files are discovered at run time?
Objectives
- Recognise when a workflow needs a
checkpoint. - Write a checkpoint that discovers input files and records them in simple file lists.
- Use
checkpoints.<name>.get()inside an input function. - Interpret the DAG before and after checkpoint expansion.
In the previous episode, we listed the datasets and chunk identifiers in advance. That works well when the workflow already knows what files it should process.
Sometimes, however, the file list is only known after an earlier step has run.
For example, you might first scan a directory, query a bookkeeping service such as
DAS (in CMS) or Rucio, or more generally,
produce one text file per dataset listing the discovered inputs. In those cases,
the downstream jobs cannot be fully determined at the start of the workflow.
This is where Snakemake checkpoints become useful. The official Snakemake
documentation describes this under
data-dependent conditional execution.
When You Need a Checkpoint
If you already know the files you want to process, use ordinary wildcards and
expand(). That is simpler and easier to read.
Use a checkpoint only when an earlier rule must first discover the files that
later rules will process.
A Checkpoint for File Discovery
We begin with a checkpoint that writes one file list per dataset:
DATASETS = ["DYJets", "TTbar", "Data"]


checkpoint get_dataset_files:
    output:
        expand("file_lists/{dataset}.txt", dataset=DATASETS)
    params:
        datasets=" ".join(DATASETS)
    shell:
        """
        mkdir -p file_lists

        for dataset in {params.datasets}; do
            find "input/$dataset" -maxdepth 1 -type f -name "*.txt" | sort > "file_lists/$dataset.txt"
            test -s "file_lists/$dataset.txt"
        done
        """
Each text file under file_lists/ contains the discovered input files for one
dataset. In a real analysis, the same pattern could come from a DAS/Rucio
query, an EOS directory scan, or some metadata service.
At this stage, it is useful to run only the checkpoint outputs and inspect what they contain:
pixi run snakemake --cores 1 \
    file_lists/DYJets.txt \
    file_lists/TTbar.txt \
    file_lists/Data.txt
Now inspect one of the file lists to see what the checkpoint produces:
cat file_lists/DYJets.txtTurning File Lists into Downstream Targets
After the checkpoint has run, we can also inspect its outputs programmatically and build the list of files that should be created by the selection step:
from pathlib import Path


def selected_files(_wildcards):
    file_lists = checkpoints.get_dataset_files.get().output
    outputs = []

    for file_list in map(Path, file_lists):
        dataset = file_list.stem

        with open(file_list, "r", encoding="utf-8") as handle:
            for line in handle:
                source_path = line.strip()

                if not source_path:
                    continue

                source = Path(source_path)
                outputs.append(str(Path("selected") / dataset / source.name))

    return outputs
The crucial line is:
checkpoints.get_dataset_files.get()This tells Snakemake:
- run the checkpoint if needed
- wait until its outputs exist
- then reevaluate the input function using those outputs
In this lesson, we read the file lists directly because it makes the reason for
the checkpoint easy to see. Another common pattern is to use
glob_wildcards() after the checkpoint has materialised its outputs.
The Full Workflow
Putting the pieces together gives:
from pathlib import Path


DATASETS = ["DYJets", "TTbar", "Data"]


def selected_files(_wildcards):
    file_lists = checkpoints.get_dataset_files.get().output
    outputs = []

    for file_list in map(Path, file_lists):
        dataset = file_list.stem

        with open(file_list, "r", encoding="utf-8") as handle:
            for line in handle:
                source_path = line.strip()

                if not source_path:
                    continue

                source = Path(source_path)
                outputs.append(str(Path("selected") / dataset / source.name))

    return outputs


rule all:
    input:
        "plots/event_counts.txt"


checkpoint get_dataset_files:
    output:
        expand("file_lists/{dataset}.txt", dataset=DATASETS)
    params:
        datasets=" ".join(DATASETS)
    shell:
        """
        mkdir -p file_lists

        for dataset in {params.datasets}; do
            find "input/$dataset" -maxdepth 1 -type f -name "*.txt" | sort > "file_lists/$dataset.txt"
            test -s "file_lists/$dataset.txt"
        done
        """


rule select_events:
    input:
        "input/{dataset}/{sample}.txt"
    output:
        "selected/{dataset}/{sample}.txt"
    shell:
        """
        mkdir -p "selected/{wildcards.dataset}"
        grep "Selected" "{input}" > "{output}" || test $? -eq 1
        """


rule make_plot:
    input:
        selected_files
    output:
        "plots/event_counts.txt"
    script:
        "plot.py"
Notice what has disappeared compared with the previous episode: we no longer
need a manually written CHUNKS = [...] list. The workflow discovers the files
and uses them to define the downstream jobs.
We also reuse the same plot.py script from the previous episode. The gather
logic does not need to change; only the way Snakemake discovers its inputs is
new.
What the DAG Looks Like
Before the checkpoint has run, Snakemake cannot yet know which select_events
jobs will exist. The workflow therefore starts with a much smaller DAG:
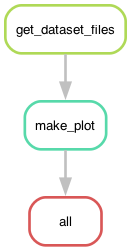
After the checkpoint has produced the file lists, Snakemake reevaluates the workflow and expands the full workflow structure:
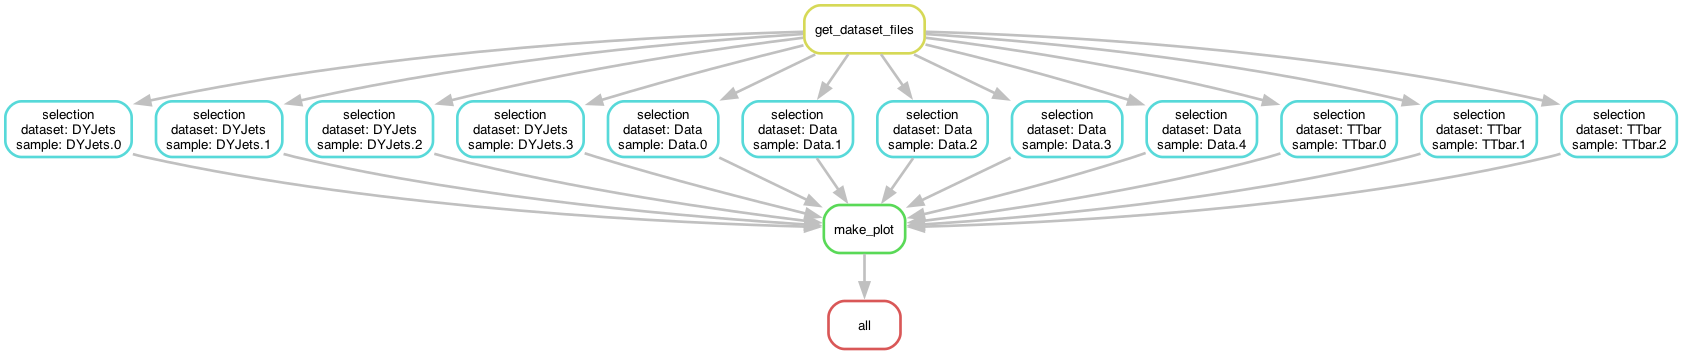
This is the core idea of a checkpoint: the DAG is not fully known at the start, so Snakemake has to discover part of it during execution.
Running the Workflow
Start with a dry-run:
pixi run snakemake -n -pThen run the workflow:
pixi run snakemake --cores 4The execution has two phases:
- Snakemake runs
get_dataset_files. - It updates the checkpoint dependencies.
- It schedules the individual
select_eventsjobs. - It runs
make_plotonce all selected files are ready.
That is why checkpoint workflows can feel different from ordinary static DAGs: Snakemake discovers part of the workflow as it goes.
Do You Really Need a Checkpoint?
Imagine that you already know the dataset names and chunk identifiers before the workflow starts.
Should you still use a checkpoint?
Show solution
Usually not. If the file list is already known in advance, ordinary wildcards
and expand() are simpler and easier to maintain.
A checkpoint is most useful when the downstream file list depends on something that must first be discovered at run time.
Key Points
- Use a
checkpointwhen the downstream file list is only known after an earlier step has run. - A
checkpointlets Snakemake pause, run a discovery step, and then reevaluate the DAG. - Input functions can inspect
checkpointoutputs and construct the downstream targets dynamically. - If the file list is already known in advance, ordinary wildcards and
expand()are simpler.
Episode
Containers
Questions
- How can I run a workflow step in a controlled software environment?
- What changes when I add a
container:directive to a rule? - What do I need in order to run containerised rules?
Objectives
- Use the
container:directive in a rule. - Run Snakemake with Apptainer using the current command-line syntax.
- Understand why different rules can use different software environments.
- Recognise which container details depend on the local site configuration.
In particle physics, we often need software that is awkward to install or keep consistent across different machines. One step may need a modern Python stack, another may need CMSSW, and a third may depend on a specific ROOT build.
Snakemake lets a rule describe not only its inputs and outputs, but also the software environment it should run in. That makes workflows more portable and more reproducible, because the rule can carry its environment with it.
Why Containers Matter
Without containers, your workflow depends on whatever happens to be installed on the machine where it runs. With containers, the workflow can say exactly which environment a given step should use.
This is especially useful in HEP because:
- the same workflow may run on a laptop, on a shared system, or on batch nodes
- different rules may genuinely need different software stacks
- the analysis logic should stay the same even when the execution environment changes
A First Containerised Rule
We can reuse the plot.py script from the previous episode and run the gather
step inside a Python container.
DATASETS = ["DYJets", "TTbar", "Data"]
CHUNKS = ["0", "1", "2"]


rule all:
    input:
        "plots/event_counts.txt"


rule select_events:
    input:
        "input/{dataset}/{dataset}.{chunk}.txt"
    output:
        "selected/{dataset}/{dataset}.{chunk}.txt"
    shell:
        """
        mkdir -p "selected/{wildcards.dataset}"
        grep "Selected" "{input}" > "{output}" || test $? -eq 1
        """


rule make_plot:
    input:
        expand(
            "selected/{dataset}/{dataset}.{chunk}.txt",
            dataset=DATASETS,
            chunk=CHUNKS,
        )
    output:
        "plots/event_counts.txt"
    container:
        "docker://python:3.11-slim"
    script:
        "plot.py"
The workflow logic is unchanged: make_plot still gathers the selected files
and writes the summary. The new part is the container: directive, which tells
Snakemake which image to use for that rule.
Running the Workflow with Apptainer
To make Snakemake execute containerised rules, use:
pixi run snakemake --cores 4 --sdm apptainerIf you run Snakemake without enabling Apptainer, the container: directive is
ignored and the rule runs in your ordinary host environment instead.
That means the workflow may still appear to work if the required software is already installed on your machine, but you are no longer actually testing the containerised version of the rule.
If your system defines TMPDIR, it is a good idea to keep the Apptainer cache
there rather than in your home directory:
export APPTAINER_CACHEDIR="${TMPDIR}/.apptainer-cache"
mkdir -p "${APPTAINER_CACHEDIR}"
If TMPDIR is not defined, use a user-specific directory under /tmp
instead:
export APPTAINER_CACHEDIR="/tmp/${USER}/.apptainer-cache"
mkdir -p "${APPTAINER_CACHEDIR}"
Older tutorials may use --use-apptainer or --use-singularity. In this
lesson, we use --software-deployment-method apptainer or the short form
--sdm apptainer, because that matches the current Snakemake documentation.
If you want, you can also store the command and cache setting in the generated
pixi.toml:
[tasks]
snakemake-apptainer = { cmd = "snakemake --cores 4 --sdm apptainer", env = { APPTAINER_CACHEDIR = "$TMPDIR/.apptainer-cache" } }
You can then run:
pixi run snakemake-apptainerFor more on Pixi tasks, see the Pixi advanced tasks documentation and the Pixi environment variable documentation.
What Happens Behind the Scenes?
When Snakemake sees a rule with a container: directive and you run with
Apptainer enabled, it will:
- resolve the requested image
- pull it if needed and cache it locally
- execute the job inside that container
- make the workflow files available to the job
From the rule author’s point of view, this is the important part: the rule
still declares input, output, and how to run the step. The container just
defines the software environment for that step.
Why Per-Rule Containers Are Useful
Different parts of a workflow may need different environments. Snakemake allows that naturally:
rule old_software_step:
    output:
        "intermediate.root"
    container:
        "docker://my-old-root-image:latest"
    shell:
        "run_old_code > {output}"


rule modern_python_step:
    input:
        "intermediate.root"
    output:
        "plots/final_summary.txt"
    container:
        "docker://python:3.11-slim"
    script:
        "plot.py"
That is a major advantage over trying to manage the whole workflow inside one shared login environment.
Practical Notes
The idea of containers is the same everywhere, but some execution details depend on the system where you run the workflow.
- On a local machine, you need Apptainer installed on the system.
- On shared systems, Apptainer may already be available.
- External paths may need additional bind mounts.
- Exact execution details can depend on the local site configuration.
A Small Reality Check
What if the container is wrong?
Change the container image for make_plot from
docker://python:3.11-slim to docker://alpine:latest and run the workflow
again.
What do you expect to happen, and why?
Show solution
The rule should fail, because alpine:latest does not provide the Python
environment needed to run plot.py.
That failure is actually useful: it shows that the job is really running inside the declared container, not in your ordinary login environment.
Key Points
- container: lets a rule declare the software environment it needs.
--software-deployment-method apptainertells Snakemake to execute containerised rules with Apptainer.- Per-rule containers keep workflow logic and software requirements explicit.
- Some details depend on where you run the workflow, for example, whether Apptainer is already installed or whether extra bind mounts are needed.
Episode
Running on HTCondor
Questions
- How do I run the same Snakemake workflow on HTCondor?
- What should go into a workflow profile?
- Why do resources and batching matter on HTCondor?
Objectives
- Understand how local and batch execution can use the same
Snakefile. - Use a workflow profile to store HTCondor-specific execution settings.
- Recognise which resource settings matter for HTCondor jobs.
- Know where to find a concrete HTCondor example for further study.
After a workflow runs locally, the next step is often to submit it to an HTCondor cluster. The main idea is simple: the workflow logic should stay the same. In most cases, you should not rewrite rules for HTCondor. Instead, you change how Snakemake is executed.
This is a short reference episode rather than a full live exercise. The
concrete example used here comes from CERN, and lives in the
snakemake-lxplus-example repository
(and will probably soon be moved under the
hep-workflows GitHub organization).
Same Workflow, Different Execution
The same rule can often run:
- locally on your machine
- on a login node
- on an HTCondor cluster such as LXBATCH
That is one of the strengths of Snakemake. The rule still declares its
input, output, resources, and software environment. What changes is the
executor and the profile that Snakemake uses at run time.
Install the Executor Plugin
In addition to snakemake itself, HTCondor execution needs the corresponding
executor plugin and the HTCondor Python bindings. If you are working in the
same Pixi environment that you created during setup, add them with:
pixi add python-htcondor snakemake-executor-plugin-htcondorAfter that, pixi run snakemake can use the HTCondor executor from the same
environment.
Use a Workflow Profile
For HTCondor execution, the cleanest approach is to keep cluster-specific settings in a workflow profile and then run Snakemake with:
pixi run snakemake --workflow-profile lxbatchFor Snakemake 9 and later, a minimal profile can be saved as
workflow/profiles/lxbatch/profile.v9+.yaml:
Minimal HTCondor profile
executor: htcondor
jobs: 5000
local-cores: 10
htcondor-jobdir: .condor_jobs
default-resources:
  - getenv=True
  - htcondor_request_mem_mb=1024
  - htcondor_request_disk_mb=1024
  - classad_JobFlavour=espresso
This keeps the workflow itself readable. The Snakefile describes the analysis,
while the profile describes how jobs should be submitted on the cluster.
A Minimal HTCondor Example
With that profile in place, a minimal Snakefile could look like:
Minimal HTCondor Snakefile
rule all:
    input:
        "local_hello.txt"


rule hello_htcondor:
    output:
        "local_hello.txt"
    shell:
        "echo Hello from $(hostname) > {output}"
You can then run:
pixi run snakemake --workflow-profile lxbatch --cores 1This uses the native snakemake-executor-plugin-htcondor and submits a simple
rule through HTCondor.
The important point is not the particular example rule. The important point is that it is still an ordinary Snakemake rule. Batch execution is selected at run time by the workflow profile.
If you want, you can add the following snippet to the generated pixi.toml:
Optional Pixi task snippet
[tasks]
snakemake-htcondor = "snakemake --workflow-profile lxbatch --cores 1"
You can then run:
pixi run snakemake-htcondorResources
When jobs run on LXBATCH, resource requests become much more important than they are in a small local example. At minimum, think about:
- memory
- disk
- runtime
It is often sensible to set conservative defaults in the profile and then override them for unusually heavy rules in the workflow itself.
CERN-specific storage examples
The CERN example repository also includes EOS examples:
- writing directly to EOS from a batch job
- reading a file from EOS and copying the result back into the workflow directory
These examples are useful because they show that storage handling can still be expressed as ordinary workflow inputs and outputs, rather than as ad hoc manual steps.
Why Batching Matters
On batch systems, the right unit of work is not always “one input file per job”. If the per-file tasks are very small, submitting one HTCondor job for each file can create unnecessary overhead.
The example repository therefore, includes two batching patterns:
- fixed-size batching
- cost-aware batching
Fixed-size batching is simpler, but cost-aware batching is often better when some samples are known to run much longer than others.
Key Points
- The
Snakefileshould usually stay the same across local and batch execution. - A workflow profile is the clean place to store HTCondor-specific executor settings.
- Resource requests and batching strategy strongly affect queue efficiency.
- The native HTCondor executor plugin avoids older submission wrappers.
Episode
Bonus: Visualising the Workflow
Questions
- How can I see the dependencies between my rules?
- What is a Directed Acyclic Graph (DAG)?
- How do I preview what Snakemake intends to do?
Objectives
- Use the
--dagflag to generate a visualization of the analysis. - Understand the difference between the Rule Graph and the File Graph.
- Use dry-runs (
-n) to verify the execution plan.
Getting the Big Picture
As your analysis grows from 2 rules to 20, and from 3 samples to 300, it becomes impossible to keep the entire workflow in your head. Snakemake provides built-in tools to “draw” your analysis for you.
The Directed Acyclic Graph (DAG)
Snakemake represents your workflow as a DAG:
- Directed: There is a clear flow from raw data to final plots.
- Acyclic: There are no loops (you can’t have a file that depends on its own output).
- Graph: A mathematical structure of nodes (rules/files) and edges (dependencies).
Generating the DAG
To create a visualisation,
we tell Snakemake to generate the DAG in a format called dot,
and then we use the graphviz tool to turn it into an image.
First, we need to install it:
pixi add graphvizRun the tool:
pixi run snakemake --dag | dot -Tpng > dag.png
# pixi run snakemake --dag | dot -Tpdf > dag.pdf   ### For PDF format
How to read the DAG:
- Nodes (Boxes): Represent the jobs that need to be run.
- Arrows: Represent the flow of data.
- Solid vs. Dashed lines: In many viewers, a dashed border indicates that the file already exists and the job doesn’t need to run.
Ensure you have the Snakefile from the previous episode with Run the DAG command: It has been reported that the command above may not work due to differences in how or you can run: Look at your DAG.
If you were to run this on a machine with only 1 core, how many steps would it take?
If you had 4 cores, how would the timing change?Visualizing our Scaled Workflow
DYJets,
TTbar, and Data. If you also completed the optional WJets challenge,
your DAG will contain one additional branch.pixi run snakemake --dag | dot -Tpng > dag.pngdot is handled.
If you encounter issues, try the following command instead:pixi run snakemake --dag | pixi run dot -Tpng > dag.pngpixi run dot -C
pixi run snakemake --dag | pixi run dot -Tpng > dag.pngdag.png, it should look like the following image.
Notice how the branches for each dataset are parallel.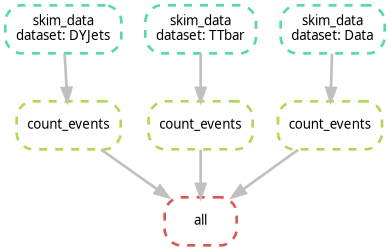
Identifying the Bottleneck
Show solution
select_events jobs at
the same time, which reduces the total wall-clock time before the final gather
step runs.
This is the power of a DAG-based system!
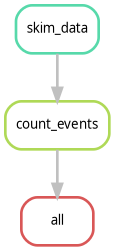
If you have 1,000 samples, the --dag command will produce a giant PDF with 1,000 boxes,
which is unreadable.
To see a simplified version that only shows how the rules connect (ignoring the individual samples), use:
pixi run snakemake --rulegraph | dot -Tpng > rulegraph.pngThis is often much more useful for complex CMS analyses to ensure the logic is correct.
The Dry-Run: “Look Before You Leap”
Before you submit 1,000 jobs to a cluster, you should always perform a Dry-Run. This tells Snakemake to calculate the DAG and print the execution plan without actually running any commands.
pixi run snakemake -nIf you want more detail (like seeing the actual shell commands that will be executed), use:
pixi run snakemake -n -pDid the previous command work?
If you run these commands on top of finished workflow, you should see something like:
Building DAG of jobs...
Nothing to be done (all requested files are present and up to date).
This is expected because all the output files already exist. If you change something in your Snakefile (like adding a new rule or changing an existing one), the dry-run will show you which jobs need to be re-run.
Alternatively, if you want to see the dry-run or the commands to execute, use:
pixi run snakemake -n -p --forceallKey Points
- DAG: A visual map of your analysis dependencies.
- Dry-run (-n): Always perform a dry-run to verify the plan before executing.
- Rule Graph: A simplified visualization showing the relationship between rules rather than individual files.